Posts Tagged ‘old fashioned flavor’

Chicken Pie

March 2, 2017
Chicken Pie Filling

Chicken Pie Filling

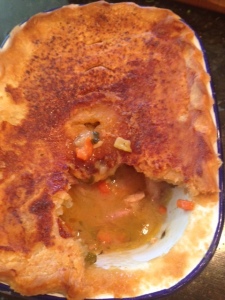
Still almost a month of winter and the morning wind blows across the park with a bitter chill. When at midweek it seems like a good idea to invite friends for Sunday lunch, I think a rich chicken pie for my new English pie dish will warm us all. Tender morsels of poached chicken robed in rich gravy with seasoning vegetables and all tucked up under flakey pastry will fill the air with appetizing aroma. Cooking a couple of days ahead makes chicken pie a simple task. One day poach the chicken in a fragrant broth; chill the broth to remove fat. The next day prepare the gravy; make the pastry. Bundle all into a lipped pie dish and chill the pie overnight. Forty minutes in the oven the following afternoon, and a princely feast awaits your guests.

Chicken Pie Ready to Bake

Chicken Pie Ready to Bake

Pot pies once a household staple for using up leftovers became the babysitter’s supper after Swanson popped them in everyone’s freezer. Those pasty, tasteless pies with faked out chemical seasonings need now to be forgotten. It’s time to resurrect the real McCoy from the archives of traditional cooking. Your run of the mill pot pie had two problems: too much soggy pastry and tasteless gravy. We’ll solve the pastry problem with a deep dish pie and a crisp, buttery top crust. A superb gravy needs an excellent stock base. If you have a lipped deep pie dish, that would be the best container, but a standard glass pie plate or baker will work equally well. Give yourself time to prepare the pie in stages. Each step will take only minutes, and the Sunday lunch rewards will keep the hounds of late winter far from your warm table.

Chicken Pie Served

Chicken Pie Served

This recipe makes a small pie that will serve 2-4, and it can easily be doubled for a family meal. Before you begin be sure you have good chicken stock, preferably homemade, and high quality, organic if possible, fresh chicken. I recommend thighs for tenderness and flavor.

Chicken Pie

1 lb, (3 large) bone in skin on chicken thighs

Sliced onion, carrot and celery

2 cups chicken stock

2 tablespoons butter

2 oz. each chopped onion, celery, carrot (total 1 ½ cups)

1 clove garlic, chopped

pinch dry thyme or teaspoon chopped fresh thyme

2 tablespoons flour

1 ½ cups reduced chicken stock from above

Salt and pepper to taste

Squeeze fresh lemon juice

2 tablespoons cream (optional)

chopped parsley

6 oz. unsweetened pie pastry*

cream or milk for glazing

Choose a heavy saucepan that will hold the chicken snugly. Line the bottom of the pan with sliced onion, carrot and celery. Top with the chicken, skin side up; sprinkle with salt and add chicken stock to cover. Top with lid and bring slowly to a simmer. Poach the chicken for 45 minutes or until tender. Turn off the heat and allow the chicken to rest in the stock 15 minutes. Remove chicken to a plate. As soon as the chicken is cool enough to handle, remove the skin, bones and any fatty bits, returning them to the stock. Pull the chicken into neat bite sized pieces. Simmer the stock another 15 minutes. Cool and strain. Chill the chicken and the stock separately allowing excess fat to rise to the stock surface and harden.

In a heavy saucepan, melt 2 tablespoons of butter and gently sauté the 2 oz. each onion, carrot and celery until softened. Add chopped garlic, thyme and sauté a few minutes. Add flour to the softened vegetables, stir to combine and cook for a few minutes. In a separate saucepan, bring the degreased stock to a boil and reduce to 1 ½ cups. Whisk the boiling stock into the flour-coated vegetables and stir all into a rich, simmering gravy. Boil gravy up a few minutes it seems too thin. Season with cream, salt, pepper, lemon juice and add a handful of chopped parsley. Once the gravy is nicely thickened, stir in the chicken, and pour the mixture into the selected pie dish, chill.

Roll the pastry into a 1/8th inch thick circle or oval as needed. Cut several ½ inch wide strips of pastry. Moisten the lip of the pie dish and stick on the pastry strips to give a base for the top pastry.. Cut steam vents in the remaining pastry. Brush the pastry strips with water and roll over the top pastry, trim excess. Flute the edges and bandage with damp strips of clean cotton (torn from an old sheet or T-shirt.) This bandage will prevent the edges from burning. Chill the pie.

An hour before serving, brush the top crust with cream or milk and bake the pie at 400° for 30-40 minutes or until golden brown. Turn off the heat and allow the pie to rest in the oven a few more minutes for further crisping. Peel off bandage. Allow the pie to settle a few minutes before serving. Add a green salad and serve 3-4.

*For a basic pastry recipe see Pie Crust, November 2016 and omit the powdered sugar for unsweetened pastry.https://mjcuisine.wordpress.com/2016/11/14/pie-crust/


Strawberry Shortcake

June 24, 2014
Strawberry Shortcake

Strawberry Shortcake

My granddaughters and I slipped out of the big blue van and peered down from the fifth floor of the parking garage next to the Evanston Farmers’ Market. There they were, swaths of red spilling across long tables: strawberries. We trotted downstairs with baskets in hand, looking for the best berries. They were all delicious, and I finally made my pick from a Michigan farmer and her two sons whose deep ruby berries caught my eye. We tasted the fruit scarlet to the core, dripping with juice. I cradled the boxes and vowed never to look at another store-bought Driscoll. It was time to pay more for the real thing. They wouldn’t be around long; they wouldn’t come in plastic clamshells; they wouldn’t keep all week in the fridge. It was time for Strawberry Shortcake.

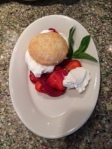
Classic American Strawberry Shortcake is a buttery sweet biscuit, split and filled with sugared berries and whipped cream. It’s pure indulgence—not a low-fat concept—something not to be missed, at least once a year. The berries must be soft and juicy; cold storage supermarket berries will never do. The biscuit dough must be “short” or rich with butter—thus shortbread cookies, shortcake, shortening (vegetable fat). I’m sticking with pure butter for my shortcake and gilding the lily with heavy cream for the liquid. These feather-light little cakes are perfect nests for juicy spoonfuls of sliced berries and clouds of whipped cream. If they seem like too much for dessert, try them for breakfast or brunch. The strawberry fields won’t be with us forever.

A note on whipping cream: Look for heavy cream that is not ultra-pasteurized. The long-life version (ultra-pasteurized) is difficult to whip and has a slightly “cooked” flavor. Ultra- pasteurized dairy products are heated 100° higher than regular pasteurized dairy items and have stabilizing additives such as carrageenan. For this once-a-year treat, pure pasteurized heavy cream is your best bet.

Cream Biscuit Shortcakes

1 cup all-purpose flour (5 oz.)

1½ tablespoons powdered sugar

1½ teaspoons baking powder

¼ teaspoon salt (a tiny bit more if using unsalted butter)

2 tablespoons butter (1 oz.)

½ cup + 1 scant tablespoon cream

sugar to sprinkle on tops

Preheat oven to 400°.

Sift flour, powdered sugar, baking powder and salt into a bowl. Slice over the chilled butter and rub in with fingertips. Make a well in center of flour mixture, pour in ½ cup cream and stir together with fingertips. Add extra cream if dough seems dry. Roll dough into a ball. Knead just a few turns on lightly floured counter. Pat or roll into a circle at least ½ inch thick. Stamp out circles with 2-inch cutter and place on baking sheet. Reroll scrapes to cut more circles. Brush tops with water and sprinkle with sugar. Bake about 12 minutes or until golden. Makes 6-8 shortcakes.

Split while warm and fill with sliced, sugared berries and whipped cream; serve with more berries.

Mary Jo's Cookbook available on Amazon

Mary Jo’s Cookbook available on Amazon


Quick French Chix

March 26, 2012

Winds may blow us off course, but eventually set us back down where we began. I’ve boned whole chickens, stuffed them with exotic rice and preserved lemons, bathed them in sauces of mushrooms, pistachios, fresh herbs and creme fraiche, but sometimes I’m ready for some simple fried chicken. I’m not interested in the boneless, battered, deep-fried model but just an honest piece of flavorful, free-range chicken seared until the skin is crispy, the meat juicy and bathed with a simple reduction of greaseless pan glazing.

Long ago I learned all it takes in addition to my heirloom cast-iron skillet, a swirl of oil, and a few cloves of garlic is a splash of common red wine vinegar. I’ve repeated this chicken sauté countless times over the decades with slight variations along the way, and it’s always a favorite. Diners will never guess the secret ingredient is vinegar that sweetens, tenderizes and moistens the chicken.

Country cooks have long known the benefits of using vinegar, one of the oldest kitchen staples. All you need are five ingredients, along with salt and pepper and half an hour to recreate the version of fried chicken that made Paul Bocuse a celebrity chef forty years ago. Even if you hesitate at the vinegar idea, you’ll want to give this healthy, tasty alternative a chance. It’s not necessary to use fancy balsamic, sherry or champagne vinegars here; simple salad vinegar, red wine or cider, is fine. For any pan-fried chicken, choose bone-in pieces that boost calcium, hold in moisture—and as most chicken aficionados know, the choice pieces are dark.

French Style Sautéed Vinegar Chicken

4 leg/thigh pieces of free-range chicken (about 2 1/2 lbs.), or one 3-lb. chicken cut in pieces.

salt and pepper

1 tablespoon olive or vegetable oil

6-8 large whole cloves garlic

4 tablespoons red wine vinegar

1 teaspoon flour

1 teaspoon tomato paste, Dijon mustard or 1 chopped fresh

tomato

3/4 cup (6 fl. oz.) chicken stock

Cut through the underside fat line between the knee and thigh joint to make two pieces or just sever the tendon so the joint will lie flat as it cooks. Blot chicken dry with paper towels and sprinkle with salt and pepper.

Swirl oil in a heavy iron skillet and heat until oil shimmers. Find a lid or a baking sheet that will cover the skillet tightly, and set aside. Using tongs, add chicken pieces, skin side down. Distribute whole, unpeeled garlic cloves among chicken pieces. Sauté over moderately high heat for ten minutes. Turn chicken, which should be deeply golden, and cook for ten minutes on the other side. At this point the chicken should be almost cooked through.

Remove chicken and garlic to a plate, and pour fat from pan (there may be as much as 4-5 tablespoons excess fat). Return chicken and garlic to skillet; bring heat back up. Measure 4 tablespoons vinegar. Once the chicken is again sizzling, pour the vinegar over the chicken and immediately cover with lid and steam the chicken for 5 minutes.  Remove the lid; again remove chicken and garlic from the skillet which will be filmed with a sticky residue from the vinegar and chicken juices; this is the precious bit to turn into a glazing sauce.

Work the teaspoon of flour into the little bit of remaining fat, and add tomato paste, mustard or diced whole tomato. Whisk in chicken stock and boil up quickly to form a light sauce. Return the chicken and garlic to the pan, coat with sauce and simmer a few seconds. Serve with sauce glaze, whole soft garlic cloves and a sprinkling of fresh parsley and chives. Serves 4. Any leftovers make excellent room-temperature picnic bits.